Recent Posts

søndag, februar 28, 2010

Used my mismatched alphastickers :) Lotus challenge #165


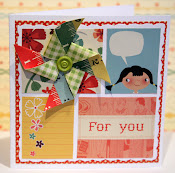
This LO was made to this weeks challenge over at Lotus paperie. "use your mismatched alpha-stickers". I had so much fun making this LO.

This fun and happy picture has been around for a while, and I really wanted to scrap it, and this challenge was perfect.

Make sure you visit Lotus Paperie for more inspiration, and to participate in this challenge.


:)

On another note:

There are some changes over at 3ndypapir.

I have really tried to make a post this week about the very sad fact, that Lene, my very best friend and "partner in crime" is leaving 3ndypapir.

But, well....

I'm so sad.

I don't know what to say.....


We have worked so hard to make this dream of ours come true, to create our own brand of patterned paper, to own this tiny little company.

I'm so thankful for all the beautiful creations all you wonderful papercrafters have made using our paper. All your wonderful encouraging comments...the success we have had with our lines and collections are all fabolous.
THANK YOU!!
This really mean alot to both Lene and me.
I have decided I will continue, I'll make new lines of paper for 3ndypapir. - I want to run this company even if Lene will not be there. She will allways be my friend, and I know we will meet and have fun and create...and maybe there will be new projects in the future.
:)

mandag, februar 22, 2010

Inspiration monday :)

Hi my friends, and happy monday :)

It's still freezing cold here in Oslo. The kids won't even go outside playing today...it's just too
cold....
but I'm here by my computer, ready for a new Inspiration monday, I wear my warm woolen pullover, and keep the fire going, so everything is good.
And today my face and my heart is smiling a extra large smile, while I welcome the readers of Scrapbooking.com magazine too.

I'm SO happy and honored my blog has been featured in this weeks Scrapbooking.com newsletter.
Thank you!!


So on to this weeks inspiration Monday.
I've been really inspired by grid-pattern lately. This is a great way to add lots of photos and keep the LO fresh and clean.
I also wanted to add alot of journaling on this LO, and decided to make a hidden journaling.
The grid allows me to put all the photos on the outside of a folded "card", and add the journaling on the inside.
This LO is a hybrid project.
I used this grid-pattern and added photos, digital elements and digital patterned paper before I printed it out on photo paper.
You can download the grid if you like and use it as your guide when you make your grid-inspired LO.
This grid template is not a layered template,
I resize my photos, use the squares as a guideline and add my photos on thop of the grey squares.
In Photoshop, resize the photos you want to use, and drag and drop them on to the template.


Put the photos in the order you like to have them, and add digital patterned paper to the squares without any photos.
I've used patterned paper by Kerry Lynn and Veronica Ponce.


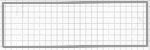
I added some free digital word art by Ali Edvards and Veronica Ponce ( free 2Peas kit ) on top of my grid.
This is one of the things I love the most about hybrid scrapbooking - my freedom to add text, words and digital elements on top of my photos without any hassle and mess.
Now, my grid-LO is ready.
I printed it out on photo paper and cut it in shape.
Now on to the paper - "traditional" - part of this LO.

This is what you'll need:
-the photo/hybrid grid-picture printed out. Mine is apx 6 1/2 inch x 6 1/2 inch (16 x 16 cm)
-background paper, I've used "frosted" patterned paper by Fancy Pants
-red cardstock (or the color you prefer for your matting / hidden journaling-card.
-white cardstock for printing your journaling
-stickers embellishments. I have used stickers from "Cosmo Cricket "Jolly by Golly"
-stickers alpha. Thickers by American crafts "rainboots"
-doublesided tape
-stamps. mine is "let it snow" by my Stamp BOX
- light color stamp pad


Start with writing your journaling ( I use word) and print it out to fit on the inside / back of your photos.
I printed mine out to be the same square size as the picture-block.
Cut the cardstock in size.

To add some more intrest to the journaling I stamped some snowflakes around the edges and on the top of the journaling with a light blue color using my "let it snow" stamp-set by my Stamp BOX.

Now I cut my red cardstock in size.
I wanted the cardstock to be folded as a card to hide my journaling-box.
I cut the cardstock to be 17 cm high and 34 cm wide, and folded it, so each side of the card is 17 cm X 17 cm (you make the size that best fits your picture-block.)

Now I added the pictures to the outside of the card and the journaling-block to the inside of the red, folded card.
I placed the block on to the background paper and used my doublesided tape to adhere the photo-journaling-"card" to the background.


I added some little stickers-embellishments on top of my picture-block and on the patterned paper.
I added the title on top of my pictures too.


Here is the journaling-block inside the folded card.
The LO is ready!
Hope you feel inspired to add some more journaling - some hidden journaling and lots of photos to your LO.
And please link me up if you make a LO inspired by this inspiration monday.
I would LOVE to see what you all create.
Have a happy week!
and THANKS a billion for popping by!
xo
gudrun

søndag, februar 21, 2010

happy winter

Hi my friends.
Hope you have a wonderful weekend.
The weather in Oslo is still ice cold winter weather. Lots of snow and -15 degrees celcius.
The kids asked me here the other day:
"mom, how long is it winter-time?"
me: "6 months"
kids: "what!!??!! are you kidding??"
me: "nope! we live in Norway......"
So yes, we still enjoy the wonderful norwegian winter....skiing, skating, sledging.....
Maybe we kind of longing for the spring now.......
longing for flowers, warmer weather, green grass....
However...I enjoy these days creating..and I have lots of new stuff coming up soon. :) :)
I also had this little button-and flower-tutorial up at LOTUS paperie the other day. Run on over for more inspiration.
Have a great week.
xo


torsdag, februar 18, 2010

frog pattern


Hi my friends.
Thanks for all your sweet comments on my last post :)
So many of you asked for the froggy pattern - so here it comes. :)
I used alpacca wool "mirasol" from Du Store Alpakka for my green frog, and just some baby-wool for the pink frog.
So without forther ado:

Amigurumi Crochet FROG
BODY
start off with ch 2.
Rnd 1: Work 6 sc in first ch; place a marker to indicate beg of rnd; move marker up as each rnd is
completed.
Rnd 2: 2 sc in each sc around - 12 sc.
Rnd 3: *2 sc in next sc, sc in next sc; rep from * around - 18 sc.
Rnd 4: *2 sc in next sc, sc in next 2 sc; rep from * around - 24 sc.
Rnd 5: *2 sc in next sc, sc in next 3 sc; rep from * around - 30 sc.
Rnd 6: *2 sc in next sc, sc in next 4 sc; rep from * around - 36 sc.
Rnd 7: *2 sc in next sc, sc in next 5 sc; rep from * around - 42 sc.
Rnds 8-17: Sc in each sc around.
Rnd 18: *Sc2tog, sc in next 5 sc; rep from * around - 36 sc.
Rnd 19: *Sc2tog, sc in next 4 sc; rep from * around - 30 sc.
Rnd 20: *Sc2tog, sc in next 3 sc; rep from * around - 24 sc.
Rnd 21: *Sc2tog, sc in next 2 sc; rep from * around - 18 sc.
Rnd 22: *Sc2tog, sc in next sc; rep from * around - 12 sc. Stuff piece.
Rnd 23: (Sc2tog) around - 6 sc.
Fasten off, leaving a long tail. Weave tail through last rnd and gather tightly. Knot to secure.
EYES (make 2)
With white, ch 2.
Rnd 1: Work 6 sc in first ch; place a marker to indicate beg of rnd; move marker up as each rnd is
completed.
Rnd 2: 2 sc in each sc around - 12 sc.
Rnds 3 and 4: Sc in each sc around.
Fasten off.
FINISHING
Arms and Legs
Join yarn to Body with sl st and ch 10.
Work (sl st, ch 5, sl st, ch 3, sl st) in 4th ch from hook.
Fasten off.
With black yarn embroider a French knot on each Eye. With red yarn embroider a straight stitch smile. Sew
Eyes to Body. Weave in ends.

STITCH EXPLANATION:
sc2tog (sc decrease) Insert hook into st and draw up a loop. Insert hook into next st and
draw up a loop. Yarn over, draw through all 3 loops on hook.

NOTES:
Work in continuous rnds; do not join or turn unless otherwise instructed.
You can make the frog any size you like, just stop increasing, or increase more rounds to make your frog the size you like.

*edited*
for my norwegian friends:
Jeg har desverre ikke mulighet til å oversette hele oppskriften, men denne bør være veldig enkel ;)
hele frosken er heklet med fastmasker.
ch = kjedemasker
sc = maske
rnd = runde
2 sc in next sc = hekle 2 masker i neste maske (legg ut 1)
sc2tog= ta sammen to masker.
:)
VOILA!

have a great week!
xo

tirsdag, februar 16, 2010

Inspiration monday :)

Hi all.
Hope you had a wonderful sunday, valentines day, mothers day, Chinese new year, Fastelaven and so on yesterday.
I had a wonderful (!) sunday with my loved family.
Lots of yummy food, gifts, flowers, chocolate, coffe, creating and a lovely winter weather here in Oslo.
:)
Eirun and I created this little amigurumi frog couple.
I made the green one...and planned on making one for each of my 4 kids as a valentine gift....BUT eirun decided this little green guy needed a wife. SO SHE crocheted the pink beauty :)
Aren't they the sweetest? :)

Well anough rambling...
I'm ready for a new inspiration monday - hope you are too :)
Today I'll share my love for a simple, fast and fun minialbum.
This album makes a great foundation for any minialbum project. All the pages are plane, neutral cardstock, so this minialbum is perfect as a gift, or just to keep for any occation you just need a minialbum :)


You'll need 3 sheets of cardstock 12x12 inch
one sheet of patterned paper (I've used one of my favorite cosmo Cricket papers from the "material girl"-line )
waxed linen thread or embrodery tread (i used both)
2 buttons
needle
(sewing machine)

Cut the 3 sheets of neutral cardstock in 12 x 6 inch size and fold all the pages in half.

Cut patterned paper in 6x6 inch (or a little bit less to leave a tiny frame of craft along the edges)and add to the outside of the cover-page


sew along the edges of the patterned paper with your sewing machine.


add two 6x6 inch pieces of paper to the inside of the cover.

Gather all the neutral pages inside the cover.

make 2 holes trough all the pages in the folded edge.

I used my needle to make holes.

Using DOUBLE tread, sew trough the holes, starting from the outside of the cover, leave a long tail of the thread on the outside, sew trough the holes, and leave the rest of the thread on the outside.
(I have used double embrodery floss pluss one waxed linen tread)

You'll now add the buttons to the thread on the outside of the cover.

put one thread trough each of the holes in the button and tie a knot and a sweet little bow on top.

I added some beads to the waxed linen tread.

Voila!

The book is ready to use!


Happy creating!

xo

lørdag, februar 13, 2010

Valentine inspiration :)

Hi my friends.
Finally I'm ready for some valentine inspiration this week.
The flu still bugs me, but I've been out today bought some sweets for my love, and I made this little mini album earlier this week.
Hope you'll get some inspiration :)
My Darling isn't much of a pink-lover. He would rather die than holding some pink stuff in his hands.... So well...I saved my pink cardstock for someone else....LOL
And instead I folded this fun little mini-album (card) for him to put on his desk...or maybe on the piano..... or in his pocket....LOL
For this project you'll need:
3 pieces of 6X6 inch (15 X 15 cm) white or neutral cardstock
2 pieces of dark brown cardstock aprx 3x3 inch or 7 X 7 cm
Pieces of patterned paper (GREAT way to use your leftover scraps)
4 photos 7 x7 cm
piece of ribbon
something to embellish the front ( I have cut the birds out of some Basic Grey patterned paper)
doublesided tape


- fold your pieces of cardstock in half and in half and in triangle. Open, and you'll get these scores: Lenghtwise, horizontal and from left to right corner.

-do the same to all the three pieces of cardstock, and glue them all together like on the picture above. :)

Crop your 4 photos in size to fit in the squares. Mine are 7 x 7 cm.
Add the photos to the open squares.


Cut pieces of patterned paper to fit in all the other open spaces of the album.
I was inspires by the colors in my photos....by patchwork.... and I wanted the colors to be all different....

Add the pieces of patterned paper to your album.

Cut two pieces of dark brown cardstock 7 x 7 cm and cut out the pattern you want to use as an embellishmenmt on the front of your album.

add a piece of doublesided tape to the front cover of your album. Add the ribbon that will bind the album together.
Add the brown square that will be the front cover on top of the ribbon, and add the back cover on the back side of your album.
It will now look like this from the back side. (the inside of the album facing away from you)
The album is basically finished now.
Add text or embellishments of your desire.
Have fun creating!!!


And please, leave me a link if you play along and make this minialbum too. I would LOVE to see your project!!
Hugs and kisses!
And
not to forget:
We are celebrating Mothers day here in Norway this sunday too - so we have three days the same day:
Valentine
Mothers day
and
fastelaven
:)
:)
Have a wonderful weekend.
xo